Difference between revisions of "Cooking and Herbalism"
GVDeveloper2 (talk | contribs) |
|||
| (25 intermediate revisions by 2 users not shown) | |||
| Line 1: | Line 1: | ||
| − | Cooking and Herbalism allows players to create foods, alcohols, and alchemical potions which provide significant buffs when consumed. Because this profession creates consumable items such as hot meals, it is always in high demand. | + | Cooking and Herbalism allows players to create foods, bandages, alcohols, and alchemical potions which provide significant buffs when consumed. Because this profession creates consumable items such as hot meals, it is always in high demand. This profession pairs well with [[Forestry and Farming]]. Initial recipes and seeds can be found at the [[Food and Herb Merchant]] in any town. |
| + | |||
| + | See [[Cooking]], [[Herbalism]], and [[Alchemy Recipes]] for a full list of recipes for this profession. | ||
==Cooking== | ==Cooking== | ||
| − | Cooking is one of the most vital skills in GV because food only stays hot for 4 hours and it's very much a profession that, like a restaurant, has busy hours and "off hours" | + | Cooking is one of the most vital skills in GV because food only stays hot for 4 hours, and it's very much a profession that, like a restaurant, has busy hours and "off hours." Cooks find themselves making piles of money during sieges, prime time and State of War. |
Most food is crafted by players in the [[Cooking and Herbalism]] profession, although some lower quality food is available to purchase from NPCs at inns. Food recipes can be purchased from vendors near inns, [[The Market | the market]], [[Glory | Glory vendors]], or from player-run [[Player Stalls | stalls]]. Recipes can also be looted from NPCs and chests. | Most food is crafted by players in the [[Cooking and Herbalism]] profession, although some lower quality food is available to purchase from NPCs at inns. Food recipes can be purchased from vendors near inns, [[The Market | the market]], [[Glory | Glory vendors]], or from player-run [[Player Stalls | stalls]]. Recipes can also be looted from NPCs and chests. | ||
| Line 8: | Line 10: | ||
Food has 3 characteristics: Quality, Nourishment, and Digestibility. The effects of eating are seen in the stomach icon. | Food has 3 characteristics: Quality, Nourishment, and Digestibility. The effects of eating are seen in the stomach icon. | ||
| − | Most food is best eaten while hot, with bread being a notable exception. | + | Most food is best eaten while hot, with bread being a notable exception. |
| − | ==Hot Food== | + | ==Food Status== |
| + | ===Hot Food=== | ||
Most foods are best eaten while hot. Food stays hot for 4 hours after cooking. After that, it cools and can be reheated, but it will have reduced quality and nourishment. Foods may only be reheated once, and upon cooling down from reheated will turn into fertilizer. | Most foods are best eaten while hot. Food stays hot for 4 hours after cooking. After that, it cools and can be reheated, but it will have reduced quality and nourishment. Foods may only be reheated once, and upon cooling down from reheated will turn into fertilizer. | ||
Hot food may be sold at the market or in player stalls. | Hot food may be sold at the market or in player stalls. | ||
| − | ==Cold Food== | + | ===Cold Food=== |
| − | Cold food is food which was previously hot. | + | Cold food is food which was previously hot. Cold food can be carried around for approximately 7 days and reheated once during that time. Cold food has a substantially lower quality than its hot counterpart and should not be eaten. Cold food may be reheated with billets which will raise it's food quality. |
| + | |||
===Reheated Food=== | ===Reheated Food=== | ||
| − | Cold food can be reheated once, restoring part of its lost quality and nourishment. Reheated food stays warm for 2 hours and turns directly into fertilizer when | + | *Cold food can be reheated once, restoring part of its lost quality and nourishment. |
| + | *Reheated food stays warm for 2 hours and turns directly into fertilizer when its timer expires. | ||
| + | *Food can be reheated directly from the inventory by right clicking your cold food and selecting "show available recipes" and choosing "reheat". There is no need for a campfire or crafting workshop to reheat food. | ||
| + | |||
| + | '''Example of the Quality difference between hot, cold, and reheated food (Higher Q is better)''' | ||
| + | |||
| + | *Cold Porridge: Q2.40 | ||
| + | *Reheated Porridge: Q5.40 | ||
| + | *Hot Porridge: Q7.45 | ||
==Stomach== | ==Stomach== | ||
| Line 26: | Line 38: | ||
==Food Quality== | ==Food Quality== | ||
| + | [[File:FoodQuality.png|600px|thumb|right|Food Quality]] | ||
All foods have quality scores which range between 1.0 and 10.0. Foods consumed contribute to your stomach’s Average Food Quality. Consuming higher quality foods leads to better overall health and stamina. Hot foods have a higher quality than cold or reheated foods. | All foods have quality scores which range between 1.0 and 10.0. Foods consumed contribute to your stomach’s Average Food Quality. Consuming higher quality foods leads to better overall health and stamina. Hot foods have a higher quality than cold or reheated foods. | ||
| Line 34: | Line 47: | ||
==Nourishment== | ==Nourishment== | ||
| − | Nourishment is how full your stomach is. The stomach has 1000 Nourishment Points in total | + | Nourishment is how full your stomach is. The stomach has 1000 Nourishment Points in total. |
| − | A Character | + | *The Stomach's total amount of Nourishment it can hold can be increased with the [[Guild Technology]] The Inn. |
| − | Nourishment does not decrease when character isn’t logged in. | + | *Each food provides a certain amount of nourishment. Higher quality foods provide more nourishment. |
| + | *There are three states of nourishment: Fed, Hungry, and Starving. | ||
| + | *A Character gets hungry by losing 6 Nourishment points per minute when moving and 2 points per minute when idle. Hunger can be slowed with the Inn in [[Guild Technology]] or by getting the "Blessing from the Gods" from the [[Rite Event]]. | ||
| + | *Nourishment does not decrease when character isn’t logged in. | ||
| − | === | + | ===Fed=== |
[[File:iconWellFed.png]] Well Fed is a buff received when total nourishment is above the hunger line (300 to 1000 points). The strength of this buff depends on the average overall food quality consumed. Consistently eating 6.0 quality food will result in a 6 quality Fed buff, for example. This increases health, stamina, health regeneration and stamina regeneration. Eating better food consistently will increase this buff over time. | [[File:iconWellFed.png]] Well Fed is a buff received when total nourishment is above the hunger line (300 to 1000 points). The strength of this buff depends on the average overall food quality consumed. Consistently eating 6.0 quality food will result in a 6 quality Fed buff, for example. This increases health, stamina, health regeneration and stamina regeneration. Eating better food consistently will increase this buff over time. | ||
| Line 51: | Line 67: | ||
==Digestibility== | ==Digestibility== | ||
| − | Foods are either “easy to digest” or “hard to digest”. Eating too many hard to digest foods can result in Gout. Hard to digest foods are rich red meat meals such as Knight’s Chuck. Easy to digest foods include poultry and fish dishes such as Codfish Filet. | + | Foods are either “easy to digest” or “hard to digest”. |
| + | |||
| + | *Eating too many hard to digest foods can result in Gout. | ||
| + | *Hard to digest foods are rich red meat meals such as Knight’s Chuck or vension. | ||
| + | *Easy to digest foods include poultry and fish dishes such as Codfish Filet or Roasted Herring. | ||
| + | *A balance between easy and hard to digest foods is important, and the timing of eating these foods. | ||
| + | |||
===Gout=== | ===Gout=== | ||
| − | Gout is a debuff that occurs after the consumption of too many hard to digest meals. This debuff reduces the quality of all foods eaten by 3.0 for several hours. To avoid this debuff, eat “hard to digest” meals sparingly. There is no warning for Gout, so keep track of how many hard to digest meals are consumed in a row. | + | Gout is a debuff that occurs after the consumption of too many hard to digest meals eaten too quickly. This debuff reduces the quality of all foods eaten by 3.0 for several hours. To avoid this debuff, eat “hard to digest” meals sparingly and don't eat too much at once. There is no warning for Gout, so keep track of how many hard to digest meals are consumed in a row. |
| + | |||
| + | Hard to Digest foods apply an invisible "gout" stack on you which decay naturally over time. Getting enough gout stacks will trigger Gout debuff. | ||
| + | |||
| + | It is possible to avoid gout entirely AND only consume Hard to Digest foods such as Knight's Chuck if you are VERY careful. Avoid eating too many hard to digest foods too quickly to avoid accumulating stacks that will eventually trigger the Gout debuff. These stacks are "invisible" and do not show on your debuff bar, so Gout can be a bit of a surprise if you're not careful. | ||
==How to Cook Food== | ==How to Cook Food== | ||
| Line 62: | Line 88: | ||
==Herbalism and Alchemy== | ==Herbalism and Alchemy== | ||
| − | Alchemy is part of the [[Cooking and Herbalism]] craft. Alchemical elixirs, tinctures, brews and potions provide significant buffs when used correctly. When used incorrectly, their effects are very minor. Alchemy's main ingredients are various herbs, plants, and alcohols. | + | Alchemy is part of the [[Cooking and Herbalism]] craft. Alchemical elixirs, tinctures, brews and potions provide significant buffs when used correctly. When used incorrectly, their effects are very minor. Alchemy's main ingredients are various herbs, plants, and alcohols. Anyone can use these mixtures but only those with Cooking and Alchemy skills can create them. |
| − | Alchemy is done at the Herbalist's Workshop, located inside of Inns. | + | Alchemy is done at the [[Herbalist's Workshop]], located inside of Inns. |
==Buff Slots and Dosage== | ==Buff Slots and Dosage== | ||
| + | [[File:ConsumableEffectsSept2022.png|thumb|right|What consumable do I need to achieve the effect I'm looking for?]] | ||
Each alchemy item uses 1 of 3 specific buff slots, and each item's effect is minor until it is dosed correctly. All 3 buff slots may be used simultaneously. Using a second, different item that uses the same buff slot will overwrite the currently active buff. There is no "synergy" or relationship between buffs on different slots. They act independently. | Each alchemy item uses 1 of 3 specific buff slots, and each item's effect is minor until it is dosed correctly. All 3 buff slots may be used simultaneously. Using a second, different item that uses the same buff slot will overwrite the currently active buff. There is no "synergy" or relationship between buffs on different slots. They act independently. | ||
| − | The three slots are: | + | The three slots are: |
| − | Tincture | + | *Tincture |
| − | Alcohol | + | *Alcohol |
| − | Potion | + | *Potion |
| + | |||
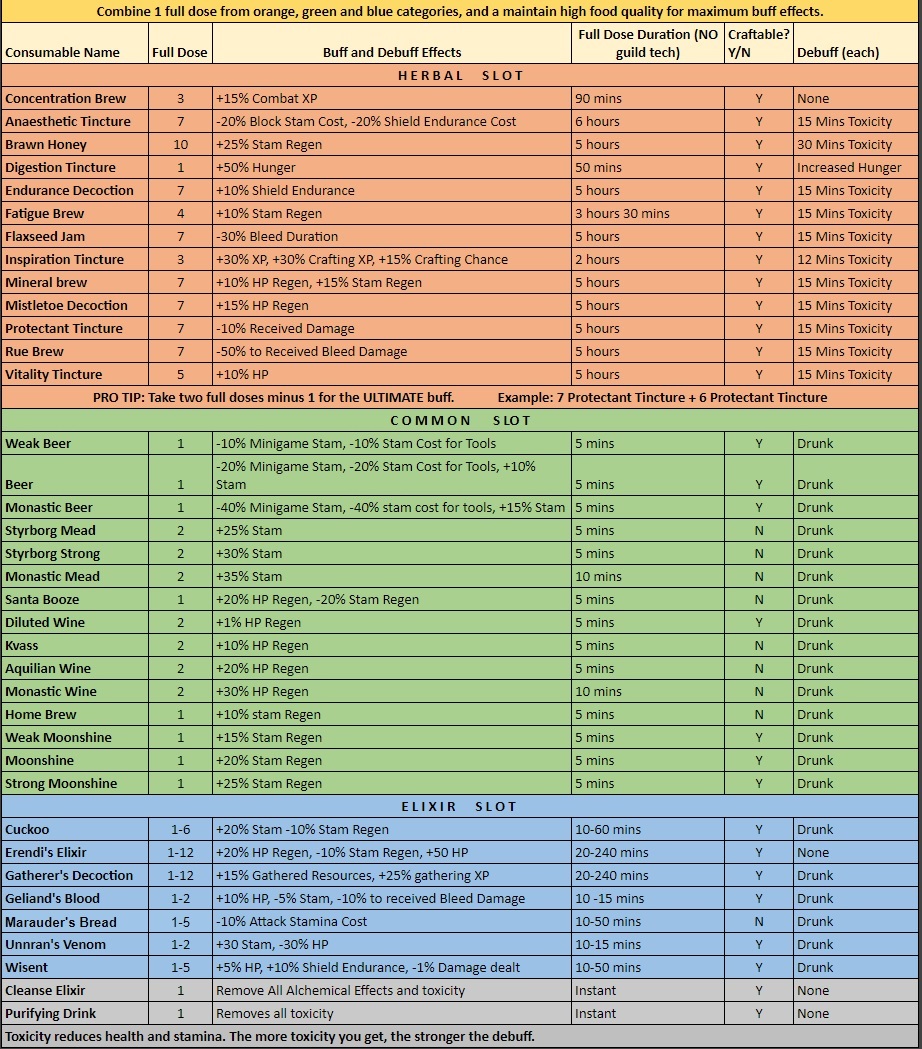
| + | '''Dosing''' is consuming a specific quantity of alchemy items one after another to achieve a long lasting, powerful buff. Failure to properly dose results in very low and insignificant buffs (around 1%, which makes players mistakenly think these items are useless). Correct dosages can result in strong buffs which last around 5 hours. Discovering the correct dosage and which buff slot an item uses is a matter of trial and error in game OR just using this chart. | ||
| − | + | Below is a full list of all current alchemical items, effects, buff slots, and optimal dosages. Duration times may be affected by the Wenedian Witch Guild Technology, but that tech does NOT change the effects. | |
| − | + | When you begin drinking a lot of these, you will build up "toxicity" which will debuff you. Use a Purifying Drink to cleanse toxicity. Use a "Cleansing Elixir" to totally erase all alchemical effects, positive and negative (useful if you want to switch to a different set of drinks). | |
'''Warning: This chart contains significant spoiler information about the system. If you enjoy discovery, do not click this link.'''<br> | '''Warning: This chart contains significant spoiler information about the system. If you enjoy discovery, do not click this link.'''<br> | ||
| − | [[Media: | + | [[Media:BuffChartJan2023.jpg|Alchemy Buff Chart]] |
| + | |||
| + | Trying to figure out how to get a specific effect? Try this chart on the right. | ||
==Ultimate Buff== | ==Ultimate Buff== | ||
Using this formula<br> | Using this formula<br> | ||
''Full Dose + (Full Dose - 1) = Ultimate Buff'' | ''Full Dose + (Full Dose - 1) = Ultimate Buff'' | ||
| − | <br> boosts the maximum effect of a buff in | + | <br> boosts the maximum effect of a buff in the HERBAL slot by a few percentage points for 1 hour. It is not common to do this, but it is possible and usually reserved for exceptional situations because this is highly resource intensive for a relatively minor additional effect. |
For example, a normal full dose of the Protection Tincture item results in 10% damage reduction. However, using the above formula, one can achieve an Ultimate Buff: | For example, a normal full dose of the Protection Tincture item results in 10% damage reduction. However, using the above formula, one can achieve an Ultimate Buff: | ||
| Line 92: | Line 123: | ||
Ultimate buffs only last 1 hour, after this, it will go back to the remaining maximum buff timer. In our example above, once the 16% damage reduction buff runs out after an hour, the player will still have 5 hours of the 10% damage reduction buff. | Ultimate buffs only last 1 hour, after this, it will go back to the remaining maximum buff timer. In our example above, once the 16% damage reduction buff runs out after an hour, the player will still have 5 hours of the 10% damage reduction buff. | ||
| − | It is possible to use 2 different consumables that use the same buff slot (such as using a full dose of Mineral brew + A full dose minus 1 of Protection tincture). However, usually people stack the same item twice because the overall effect is higher. | + | It is possible to use 2 different consumables that use the same buff slot (such as using a full dose of Mineral brew + A full dose minus 1 of Protection tincture). However, usually people stack the same item twice because the overall effect is higher. |
For example: 7 Protection tinctures + 6 Protection tinctures = 16% damage reduction. | For example: 7 Protection tinctures + 6 Protection tinctures = 16% damage reduction. | ||
| Line 100: | Line 131: | ||
7 Protection tinctures + 6 Mineral Brew= 10% damage reduction and 6% stamina regen for example. | 7 Protection tinctures + 6 Mineral Brew= 10% damage reduction and 6% stamina regen for example. | ||
| − | The Ultimate Buff only applies to | + | '''The Ultimate Buff only applies to the Herbal slot. Alcohol and potions cannot be boosted in this way.''' |
==Toxicity== | ==Toxicity== | ||
| − | Even proper dosages of potions and tinctures result in a debuff called Toxicity. | + | Even proper dosages of potions and tinctures result in a debuff called Toxicity which reduces your HP and Stam. More stacks of Toxicity result in higher debuffs for a longer period of time. Toxicity can last around an hour if you are taking a full dose of 5-10 potions or tinctures. Toxicity can be cured with [[Purifying Drink]] without harming your buffs. |
| + | |||
| + | The [[Cleanse Elixir]] will remove ALL alchemical effects, including buffs, toxicity and debuffs. This can be useful when you want to "erase" your current buff/debuff situation and start with a clean slate. | ||
==Recipes== | ==Recipes== | ||
| − | Cooking and alchemy recipes may be bought from Food and Herb merchants in each city near Inns or Markets. Different cities have different recipes, so look around. Recipes can also be looted from humanoid enemies, chests, purchased at the Glory | + | Full list of cooking and herbalism recipes: [[Cooking]], [[Herbalism]], and [[Alchemy Recipes]] |
| + | |||
| + | Cooking and alchemy recipes may be bought from Food and Herb merchants in each city near Inns or Markets. Different cities have different recipes, so look around. Recipes can also be looted from humanoid enemies, chests, purchased at the [[Glory Quartermaster]], or purchased on the player Market. | ||
It is not possible to learn recipes by disassembling or consuming food/alchemy items as it is in other professions. | It is not possible to learn recipes by disassembling or consuming food/alchemy items as it is in other professions. | ||
Also see:[[Crafting]] | [[Forestry and Farming]] | [[Food]] | Also see:[[Crafting]] | [[Forestry and Farming]] | [[Food]] | ||
Latest revision as of 14:16, 12 March 2026
Cooking and Herbalism allows players to create foods, bandages, alcohols, and alchemical potions which provide significant buffs when consumed. Because this profession creates consumable items such as hot meals, it is always in high demand. This profession pairs well with Forestry and Farming. Initial recipes and seeds can be found at the Food and Herb Merchant in any town.
See Cooking, Herbalism, and Alchemy Recipes for a full list of recipes for this profession.
Cooking
Cooking is one of the most vital skills in GV because food only stays hot for 4 hours, and it's very much a profession that, like a restaurant, has busy hours and "off hours." Cooks find themselves making piles of money during sieges, prime time and State of War.
Most food is crafted by players in the Cooking and Herbalism profession, although some lower quality food is available to purchase from NPCs at inns. Food recipes can be purchased from vendors near inns, the market, Glory vendors, or from player-run stalls. Recipes can also be looted from NPCs and chests.
Food has 3 characteristics: Quality, Nourishment, and Digestibility. The effects of eating are seen in the stomach icon.
Most food is best eaten while hot, with bread being a notable exception.
Food Status
Hot Food
Most foods are best eaten while hot. Food stays hot for 4 hours after cooking. After that, it cools and can be reheated, but it will have reduced quality and nourishment. Foods may only be reheated once, and upon cooling down from reheated will turn into fertilizer. Hot food may be sold at the market or in player stalls.
Cold Food
Cold food is food which was previously hot. Cold food can be carried around for approximately 7 days and reheated once during that time. Cold food has a substantially lower quality than its hot counterpart and should not be eaten. Cold food may be reheated with billets which will raise it's food quality.
Reheated Food
- Cold food can be reheated once, restoring part of its lost quality and nourishment.
- Reheated food stays warm for 2 hours and turns directly into fertilizer when its timer expires.
- Food can be reheated directly from the inventory by right clicking your cold food and selecting "show available recipes" and choosing "reheat". There is no need for a campfire or crafting workshop to reheat food.
Example of the Quality difference between hot, cold, and reheated food (Higher Q is better)
- Cold Porridge: Q2.40
- Reheated Porridge: Q5.40
- Hot Porridge: Q7.45
Stomach

The stomach icon displays information about your nourishment and average food quality. The green stomach content represents how full you currently are. The horizontal line running across the lower third of the stomach represents the level at which you will become hungry.
Your stomach averages together the last few dozen things you’ve eaten and provides you with an average food quality. Eating a few low quality things can really affect your overall health, so eating well consistently is key to good health (and good buffs).
Hover the mouse over the stomach icon to get information on your current food quality and nourishment.
Food Quality

All foods have quality scores which range between 1.0 and 10.0. Foods consumed contribute to your stomach’s Average Food Quality. Consuming higher quality foods leads to better overall health and stamina. Hot foods have a higher quality than cold or reheated foods.
Average Food Quality
Your stomach’s Average Food Quality represents how well you are eating and is an average of the last few dozen things consumed.
Eating higher quality foods will result in a better Food Quality buff when at Fed status which can be seen in the upper left in the Status Bar. This buff improves health, stamina, health regeneration and stamina regeneration, so it is important to eat good food regularly to maintain a good Fed buff. Eating low quality food just to fill up will significantly reduce your buff.
Nourishment
Nourishment is how full your stomach is. The stomach has 1000 Nourishment Points in total.
- The Stomach's total amount of Nourishment it can hold can be increased with the Guild Technology The Inn.
- Each food provides a certain amount of nourishment. Higher quality foods provide more nourishment.
- There are three states of nourishment: Fed, Hungry, and Starving.
- A Character gets hungry by losing 6 Nourishment points per minute when moving and 2 points per minute when idle. Hunger can be slowed with the Inn in Guild Technology or by getting the "Blessing from the Gods" from the Rite Event.
- Nourishment does not decrease when character isn’t logged in.
Fed
![]() Well Fed is a buff received when total nourishment is above the hunger line (300 to 1000 points). The strength of this buff depends on the average overall food quality consumed. Consistently eating 6.0 quality food will result in a 6 quality Fed buff, for example. This increases health, stamina, health regeneration and stamina regeneration. Eating better food consistently will increase this buff over time.
Well Fed is a buff received when total nourishment is above the hunger line (300 to 1000 points). The strength of this buff depends on the average overall food quality consumed. Consistently eating 6.0 quality food will result in a 6 quality Fed buff, for example. This increases health, stamina, health regeneration and stamina regeneration. Eating better food consistently will increase this buff over time.
Each stack of the buff gives 0.5% health and 2.5% stamina, and it can stack up to 10 times.
Hungry
![]() Being hungry occurs when the nourishment level is below the hunger line, but the stomach is not totally empty. At this point the Well Fed buff is lost. Hunger occurs at 330/1000 nourishment.
Being hungry occurs when the nourishment level is below the hunger line, but the stomach is not totally empty. At this point the Well Fed buff is lost. Hunger occurs at 330/1000 nourishment.
Starving
![]() Starving is a debuff that reduces health and stamina by 10% when the stomach is entirely empty. Starving does not affect Average Food Quality.
Starving is a debuff that reduces health and stamina by 10% when the stomach is entirely empty. Starving does not affect Average Food Quality.
Digestibility
Foods are either “easy to digest” or “hard to digest”.
- Eating too many hard to digest foods can result in Gout.
- Hard to digest foods are rich red meat meals such as Knight’s Chuck or vension.
- Easy to digest foods include poultry and fish dishes such as Codfish Filet or Roasted Herring.
- A balance between easy and hard to digest foods is important, and the timing of eating these foods.
Gout
Gout is a debuff that occurs after the consumption of too many hard to digest meals eaten too quickly. This debuff reduces the quality of all foods eaten by 3.0 for several hours. To avoid this debuff, eat “hard to digest” meals sparingly and don't eat too much at once. There is no warning for Gout, so keep track of how many hard to digest meals are consumed in a row.
Hard to Digest foods apply an invisible "gout" stack on you which decay naturally over time. Getting enough gout stacks will trigger Gout debuff.
It is possible to avoid gout entirely AND only consume Hard to Digest foods such as Knight's Chuck if you are VERY careful. Avoid eating too many hard to digest foods too quickly to avoid accumulating stacks that will eventually trigger the Gout debuff. These stacks are "invisible" and do not show on your debuff bar, so Gout can be a bit of a surprise if you're not careful.
How to Cook Food
Food can be cooked at the Herbalist's Workshop within inns. Inns can be found at guild provinces, and inside the walls of major locations on the link system. Some simple foods can be prepared at campfires.
Other Uses for Food
Cooked food fulfills needs in each location's Bastion which helps raise the Bastion's efficiency, and certain meals are required materials for upgrading Guardhouses. After food gets cold, it will eventually decay into Fertilizer, which is used to speed up the growth of crops. Bread can be disassembled into bread balls and used as a low quality fishing bait.
Herbalism and Alchemy
Alchemy is part of the Cooking and Herbalism craft. Alchemical elixirs, tinctures, brews and potions provide significant buffs when used correctly. When used incorrectly, their effects are very minor. Alchemy's main ingredients are various herbs, plants, and alcohols. Anyone can use these mixtures but only those with Cooking and Alchemy skills can create them.
Alchemy is done at the Herbalist's Workshop, located inside of Inns.
Buff Slots and Dosage

Each alchemy item uses 1 of 3 specific buff slots, and each item's effect is minor until it is dosed correctly. All 3 buff slots may be used simultaneously. Using a second, different item that uses the same buff slot will overwrite the currently active buff. There is no "synergy" or relationship between buffs on different slots. They act independently.
The three slots are:
- Tincture
- Alcohol
- Potion
Dosing is consuming a specific quantity of alchemy items one after another to achieve a long lasting, powerful buff. Failure to properly dose results in very low and insignificant buffs (around 1%, which makes players mistakenly think these items are useless). Correct dosages can result in strong buffs which last around 5 hours. Discovering the correct dosage and which buff slot an item uses is a matter of trial and error in game OR just using this chart.
Below is a full list of all current alchemical items, effects, buff slots, and optimal dosages. Duration times may be affected by the Wenedian Witch Guild Technology, but that tech does NOT change the effects.
When you begin drinking a lot of these, you will build up "toxicity" which will debuff you. Use a Purifying Drink to cleanse toxicity. Use a "Cleansing Elixir" to totally erase all alchemical effects, positive and negative (useful if you want to switch to a different set of drinks).
Warning: This chart contains significant spoiler information about the system. If you enjoy discovery, do not click this link.
Alchemy Buff Chart
Trying to figure out how to get a specific effect? Try this chart on the right.
Ultimate Buff
Using this formula
Full Dose + (Full Dose - 1) = Ultimate Buff
boosts the maximum effect of a buff in the HERBAL slot by a few percentage points for 1 hour. It is not common to do this, but it is possible and usually reserved for exceptional situations because this is highly resource intensive for a relatively minor additional effect.
For example, a normal full dose of the Protection Tincture item results in 10% damage reduction. However, using the above formula, one can achieve an Ultimate Buff:
7 Protection tinctures + 6 protection Tinctures = 16% damage reduction for 1 hour.
Ultimate buffs only last 1 hour, after this, it will go back to the remaining maximum buff timer. In our example above, once the 16% damage reduction buff runs out after an hour, the player will still have 5 hours of the 10% damage reduction buff.
It is possible to use 2 different consumables that use the same buff slot (such as using a full dose of Mineral brew + A full dose minus 1 of Protection tincture). However, usually people stack the same item twice because the overall effect is higher.
For example: 7 Protection tinctures + 6 Protection tinctures = 16% damage reduction.
16% damage reduction tends to be more appealing than, for example:
7 Protection tinctures + 6 Mineral Brew= 10% damage reduction and 6% stamina regen for example.
The Ultimate Buff only applies to the Herbal slot. Alcohol and potions cannot be boosted in this way.
Toxicity
Even proper dosages of potions and tinctures result in a debuff called Toxicity which reduces your HP and Stam. More stacks of Toxicity result in higher debuffs for a longer period of time. Toxicity can last around an hour if you are taking a full dose of 5-10 potions or tinctures. Toxicity can be cured with Purifying Drink without harming your buffs.
The Cleanse Elixir will remove ALL alchemical effects, including buffs, toxicity and debuffs. This can be useful when you want to "erase" your current buff/debuff situation and start with a clean slate.
Recipes
Full list of cooking and herbalism recipes: Cooking, Herbalism, and Alchemy Recipes
Cooking and alchemy recipes may be bought from Food and Herb merchants in each city near Inns or Markets. Different cities have different recipes, so look around. Recipes can also be looted from humanoid enemies, chests, purchased at the Glory Quartermaster, or purchased on the player Market.
It is not possible to learn recipes by disassembling or consuming food/alchemy items as it is in other professions.
Also see:Crafting | Forestry and Farming | Food